Hardware

Laboratory consumables required:

Glass Vials: Chi.Bio uses standard 30ml flat-bottom Laboratory sample vials (25mm diameter, 95mm height). We recommend Part Number 11593532 available from Fisher Scientific. 

Silicone Tubing: Chi.Bio uses standard 4.5mm/2.5mm Outer/Inner diameter laboratory tubing (or equivalently 2.5mm Inner diameter/bore and 1mm wall thickness). We recommend Part Number 01-93-1416/20 available from Altec. Expect to use at minimum 1.5m of tubing per peristaltic pump.

Magnetic Stir Bars: A range of standard stir bars work with Chi.Bio. We recommend part number 11878892 or 11818862 from Fisher Scientific. Many other stir bars work; ideally they should be 6mm-15mm in length, and not have a very strong internal magnet (as this may stall the stirring motor).

Setup required for purchased Chi.Bio devices:

There is minimal setup required for Chi.Bio devices purchased ready-built from Labmaker. The necessary steps (attaching the pump board’s legs, and inserting tubing) are outlined in the purchased devices assembly document:

Mechanical Assembly Guide (for purchased devices) V1.1 (pdf)

Application Specific Lids:

Chi.Bio comes with a lid made from PCBs and a rubber washer, which works well for many applications, and allows the culture volume to be easily adjusted. For applications in which a higher level of sterility is required, or control of atmosphere (e.g. anaerobic growth) is desired, a 3D printed closure can be used:

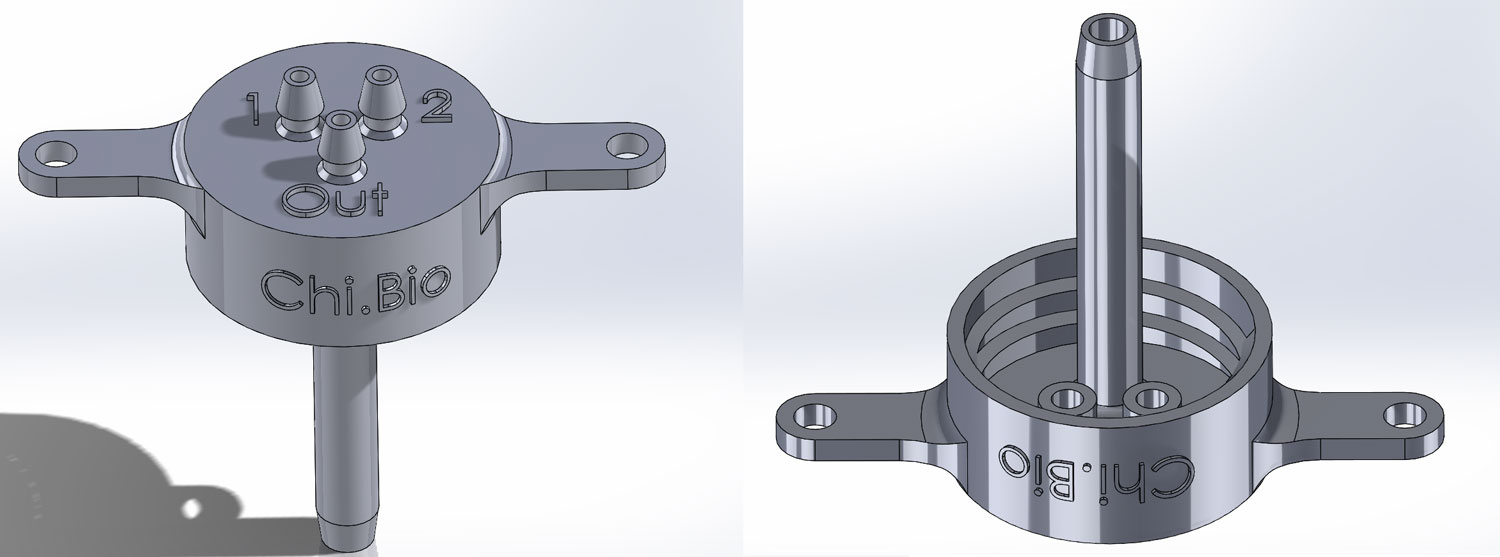
Chi.Bio screw-top lid (20mL, 3 port) V1.6 (stl+step)

Chi.Bio screw-top lid (20mL, 4 port) V1.6 (stl+step)

Chi.Bio screw-top lid (20mL, 5 port) V1.6 (stl+step)

Important considerations for 3D printing this lid are a) Using a method that allows fine details (namely, the ~1.5mm diameter holes in the lid must not be filled in). and b) Ideally a high-temperature plastic should be used such that the lid can be autoclaved. We have printed several variants of this lid with 3DPrintDirect using their SLS printing service with PA12 Nylon material, for which printing costs for lid V1.1 are approximately $3 per item. A superior autoclavable material is the Visijet M2S-HT90, though it is less widely available. 

If you are having trouble with the 3D lids leaking, which can set off the moisture sensor, we recommend adding a rubber (ideally FKM since it is autoclavable) O-ring to the underside. Ideal dimensions are 15mm Inner Diameter 18mm Outer Diameter. Here is an example.

In addition to the Chi.Bio lids above, we have also designed GL-45 lids for media bottles which allow the tubing+bottle+media+lid to be autoclaved fully assembled, reducing the potential for contamination. Note you always need to have one port clear for air to get IN to the bottle, hence the 5 port lid is designed to connect 4 reactors and so on.

GL-45 Cap 2-Port V1.4 (stl+step)

GL-45 Cap 4-Port V1.4 (stl+step)

GL-45 Cap 5-Port V1.4 (stl+step)

Building Chi.Bio yourself

Chi.Bio Assembly Documentation and Schematics V1.0 (zip

Chi.Bio Assembly Documentation and Schematics V1.3 (zip)

If you intend to assemble/build Chi.Bio yourself, first have a thorough look through the schematics provided above. The platform is built entirely from custom-made PCBs, electronic components (almost all from Digikey), and off-the-shelf fasteners (e.g. nuts/bolts). In the above documentation each PCB includes a parts list with Digikey part numbers, and there is an “Additional Materials” spreadsheet detailing all fasteners and other required components. In some cases parts might be out of stock at the recommended supplier, if you have questions about substituting parts please post in the Assembly/Setup forum.

Broadly, the steps required to build Chi.Bio are:

  1. Manufacture PCBs (many cost-effective suppliers exist, we frequently use PCBWay).
  2. Assemble/Solder PCBs (see soldering tips in assembly manual below).
  3. Mechanical Assembly (nuts & bolts, and minimal gluing, see steps in assembly manual). 

To avoid tricky soldering it is possible to combine steps 1 and 2 by having your PCBs manufactured and assembled by a 3rd party. All documentation required for this (i.e. pick-and-place files) is provided with the PCB schematics. Note that PCB assembly in small quantities can be expensive, and may end up costing more than just buying pre-made devices from Labmaker. 

Once assembled PCBs are in-hand, the mechanical assembly of Chi.Bio is relatively straight forward (taking approximately 20 minutes per device), and does not require any specialist tools. The Mechanical Assembly Guide (for self-built devices) provided below outlines each step in this process. 

Mechanical Assembly Guide (for self-build) V1.0 (pdf)

Scroll to top